
Making footwear for your dolls can seem like a tricky task, but this handy, fully detailed tutorial will show you how you can make your own adorable little boots for your favourite mini guys and girls!

 You will need:
- Leather 30cm x 20cm approx. – this needs to be thin and flexible. Some shops sell off-cuts, which should work out cheaper than a large piece
- Eyelets x 20 (or more if you want to make bigger boots). These should preferably very small: 1/8” or 2.5mm)
- Nylon Thread to match your Leather Colour
- Cord/Ribbon 100cm - for the laces
- Cling film - to protect your doll’s feet
- Oven-bake or Air-dry clay (such as Fimo or Sculpey) - for the soles
- Air-dry or Paper-clay (such as LaDoll, Milliput White) - to make a toecap
- Piece of thin card (A5 size is fine)
- Sheet of plain A4 paper
- Leather Needle – needs to be strong but not too thick
- Glue – PVA or Uhu
- Sharp Embroidery Scissors
- Revolving Punch Pliers – sizes to match your eyelets
- Eyelet Setter – size to match your eyelets
- Pencil – to make paper templates
- Fine-tipped marker pen - to mark eyelet positions on the Clingfilm
- Tape measure
- Sewing machine can be used but not essential
Got all your materials? Then let’s get started!
Prep Work & Templates

The first step is to wrap your doll’s feet in cling film to protect them. This is easiest if you have a BJD and can simply unhook the foot along with the ankle joint, however if you are working with a different doll whose feet are not removable don’t worry, you can still complete this tutorial! Just wrap the Clingfilm a little further up the leg to the knee. [1]

You only need to use a little Clingfilm, about 10cm2 per foot should be fine, as you don’t want to obscure the shape of the foot too much. [2]
This is because the next step is to place the wrapped foot on to the piece of thin card and trace around it with a pencil to make an insole. [3]


Lift up the foot and round off the front around the toes to make the shoe shape. [4] Cut out this insole shape, turn it over and trace around it to make your second insole shape. Cut this out too and match it up to the first one to make sure they are equal in size. [5]

Also cut out a second pair that are 1-2mm larger all around so you can later use these as a template for the outer sole.

Dab a little PVA glue onto the card insoles and carefully position the wrapped doll feet onto them. If you offer them up to each other, sole to sole, you can check that they are evenly aligned. The edges of the leather vamps will be glued to the underside of this insole and won’t be visible when complete. [6]

The next step is to mould a toecap so that the shoe will keep a nice shape. You can use any kind of air-dry or paper-clay, or putty such as Milliput White for this. It’ll be on the inside of the shoe and won’t be seen. I have used LaDoll Premix in this tutorial as I find it handy to use - it dries quite quickly and can easily be sanded. Simply mould onto the front of sole over your doll’s toes and leave to dry. [7]

Once dry, sand the toecap into a smooth even shape. [8]
Next mark out the centre line and the eyelet positions onto the Clingfilm using your marker pen. [9]


Now that the doll foot is prepared, it’s time to make some paper templates for the toe box, vamp and tongue of the boot (or in other words all the leather uppers that make up the boot). Place the foot onto the A4 plain paper and trace around the toe shape offset at about 1.5cm. Stop at 5mm beyond the line across the foot that you have marked with the marker pen. This will make your toe box. [10]

Next place the doll foot on its side and trace around it at an offset of about 1.5cm. Stop at 5mm beyond the toecap line you made with the marker pen. This is to give you enough of an overlap with the toe box piece. On top of the foot where your eyelets will be, the offset needs to be only about 3mm. Simply trace along the edge of the foot and curve up to the boot opening at the top. [11]
At this stage you can decide how tall you want your boots to be, just extend the lines upwards as far as you want to go, remembering that you will need to strike an angled curve at the back to allow room for the calves (use your doll’s leg as a guide).
And finally we need a template for the tongue. Using the vamp template place the end of the tape measure on edge from the toe-line and run it up to the top of the boot. Cut a strip of paper as long as this measurement + 1.5cm, at 4cm wide. The extra is so that you have a seam allowance and enough to glue underneath the toecap part. Round off the top edges of the tongue.

After all this prep work we are now ready to cut out the leather parts! Using your templates cut out 2x toe box, 2x tongues, 2x left and right vamps. [12]
Onto the sewing! I like to sew these by hand with a backstitch as I can get better control, especially at this small scale. However if you have a sewing machine that handles small pieces of leather well, feel free to use this instead. Alternatively, if you want a quicker method you can glue the seams rather than sewing them.

First place a pair of vamp pieces back to back (fuzzy side out) and sew up along the heel edge with a seam of about 5mm. Follow the curve of the edge so that it will fit the heel and ankle nicely. [13]
Then fold the seams back and glue these in place with a tiny bit of PVA, so that they lie flat inside the boot. [14]


This part is a little fiddly but is quite important to check the boot will fit well. Offer up the sewn vamp piece to the doll’s foot, leaving an allowance of about 5mm beyond the card insole on the bottom. On top, check that the two sides of the vamp meet each other neatly in line with your marker line, overlapping each other by 2-3mm. [15] [16] Trim if necessary.


If you are happy with how the vamps sit, proceed to sew a seam of about 5mm all around them, excluding the bottom as this will be glued to the underside of the card insole. [17]

On the paper template of the vamp piece mark out with a pencil the eyelet positions, ensuring they are evenly spaced and leave enough room between each other. If you are using 2.5mm eyelets, space them at least 8mm (from one centre point to the next). Use the punch pliers to make the holes into the paper and then mark them out on the leather with a pencil. [18]
Punch the holes into each side taking care that they are symmetrical. [19]


Now you can use your eyelet setter to secure the eyelets in place. [20]

Sew a seam to the tongue, which will look a bit neater than leaving a cut edge. However if your boots are for a smaller doll, I would suggest to avoid this step as it may be too bulky. I have sewn a 5mm seam all around except at the base. [21]
The bottom of the tongue is to be glued to the underside of the toe box piece, centred on the straight edge.

Now dab a little glue on top of the moulded toecap and fix the toe box piece to it. First fold the front under and glue it to the underside of the card insole. [22]

Next glue the side edges and then glue down the parts in between, and using small, sharp scissors to cut out little triangles to prevent lumpy folds. [23]

The main vamp piece can now be glued on. First, fold under 5mm at the heel part and glue it to the underside of the insole. Next fold under and glue down the side edges and then the parts in between to the underside of the card insole, making little triangle cut-outs as before. Make sure that the eyelets line up symmetrically on the vamp, and also that the leather on the underside of the insole sits as flat as possible. [24]

Your first boot is nearly done! All you need now is a sole – the spare, slightly larger card soles you cut out at the beginning can be used as the template for this. Simply knead and roll out some Fimo (or another oven-bake or air-dry clay of your choice) about 3-4mm thick and cut out the sole shape to the template. Make some ridges on the base (or pattern if you’re feeling adventurous!) with a knife or sculpting tool, and then bake as per the instructions. [25]
Now you can get started on the other boot during the baking and cooling time!

Once cooled, you can glue the soles to the underside of each boot: First, carefully remove the doll foot from the shoe, leaving the card insole and toecap inside the boot. Then spread some glue onto the underside of the insole and then press it firmly against the sole, so that you get a nice neat join. Wait for the glue to set. [26]
 Now for the fun bit – lace up your boot with your cord or ribbon… and that’s it! [27]
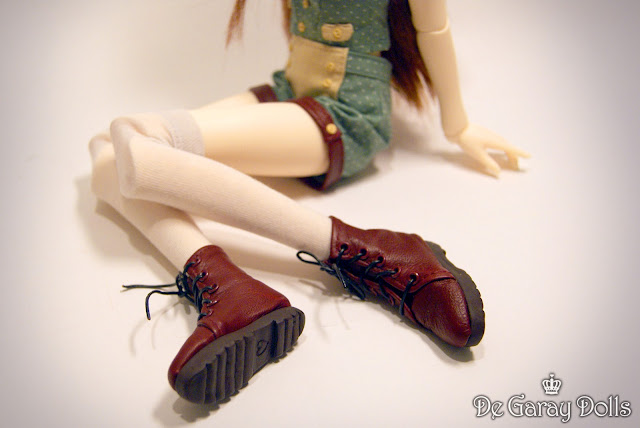
Your dolly-girl or boy is now ready to show off their new style!
I hope you enjoyed this tutorial and found it useful! Feel free to leave any questions or comments, or to share links of your creations :)
Here's Evie showing off again ;)


- Leather 30cm x 20cm approx. – this needs to be thin and flexible. Some shops sell off-cuts, which should work out cheaper than a large piece
- Eyelets x 20 (or more if you want to make bigger boots). These should preferably very small: 1/8” or 2.5mm)
- Nylon Thread to match your Leather Colour
- Cord/Ribbon 100cm - for the laces
- Cling film - to protect your doll’s feet
- Oven-bake or Air-dry clay (such as Fimo or Sculpey) - for the soles
- Air-dry or Paper-clay (such as LaDoll, Milliput White) - to make a toecap
- Piece of thin card (A5 size is fine)
- Sheet of plain A4 paper
- Leather Needle – needs to be strong but not too thick
- Glue – PVA or Uhu
- Sharp Embroidery Scissors
- Revolving Punch Pliers – sizes to match your eyelets
- Eyelet Setter – size to match your eyelets
- Pencil – to make paper templates
- Fine-tipped marker pen - to mark eyelet positions on the Clingfilm
- Tape measure
- Sewing machine can be used but not essential
Got all your materials? Then let’s get started!
Prep Work & Templates

1
The first step is to wrap your doll’s feet in cling film to protect them. This is easiest if you have a BJD and can simply unhook the foot along with the ankle joint, however if you are working with a different doll whose feet are not removable don’t worry, you can still complete this tutorial! Just wrap the Clingfilm a little further up the leg to the knee. [1]

2
You only need to use a little Clingfilm, about 10cm2 per foot should be fine, as you don’t want to obscure the shape of the foot too much. [2]
This is because the next step is to place the wrapped foot on to the piece of thin card and trace around it with a pencil to make an insole. [3]

3

4
Lift up the foot and round off the front around the toes to make the shoe shape. [4] Cut out this insole shape, turn it over and trace around it to make your second insole shape. Cut this out too and match it up to the first one to make sure they are equal in size. [5]

5
Also cut out a second pair that are 1-2mm larger all around so you can later use these as a template for the outer sole.

6
Dab a little PVA glue onto the card insoles and carefully position the wrapped doll feet onto them. If you offer them up to each other, sole to sole, you can check that they are evenly aligned. The edges of the leather vamps will be glued to the underside of this insole and won’t be visible when complete. [6]

7

8
Once dry, sand the toecap into a smooth even shape. [8]
Next mark out the centre line and the eyelet positions onto the Clingfilm using your marker pen. [9]

9

10
Now that the doll foot is prepared, it’s time to make some paper templates for the toe box, vamp and tongue of the boot (or in other words all the leather uppers that make up the boot). Place the foot onto the A4 plain paper and trace around the toe shape offset at about 1.5cm. Stop at 5mm beyond the line across the foot that you have marked with the marker pen. This will make your toe box. [10]

11
Next place the doll foot on its side and trace around it at an offset of about 1.5cm. Stop at 5mm beyond the toecap line you made with the marker pen. This is to give you enough of an overlap with the toe box piece. On top of the foot where your eyelets will be, the offset needs to be only about 3mm. Simply trace along the edge of the foot and curve up to the boot opening at the top. [11]
At this stage you can decide how tall you want your boots to be, just extend the lines upwards as far as you want to go, remembering that you will need to strike an angled curve at the back to allow room for the calves (use your doll’s leg as a guide).
And finally we need a template for the tongue. Using the vamp template place the end of the tape measure on edge from the toe-line and run it up to the top of the boot. Cut a strip of paper as long as this measurement + 1.5cm, at 4cm wide. The extra is so that you have a seam allowance and enough to glue underneath the toecap part. Round off the top edges of the tongue.
Leather Work

12
After all this prep work we are now ready to cut out the leather parts! Using your templates cut out 2x toe box, 2x tongues, 2x left and right vamps. [12]
Onto the sewing! I like to sew these by hand with a backstitch as I can get better control, especially at this small scale. However if you have a sewing machine that handles small pieces of leather well, feel free to use this instead. Alternatively, if you want a quicker method you can glue the seams rather than sewing them.

13
First place a pair of vamp pieces back to back (fuzzy side out) and sew up along the heel edge with a seam of about 5mm. Follow the curve of the edge so that it will fit the heel and ankle nicely. [13]
Then fold the seams back and glue these in place with a tiny bit of PVA, so that they lie flat inside the boot. [14]

14

15
This part is a little fiddly but is quite important to check the boot will fit well. Offer up the sewn vamp piece to the doll’s foot, leaving an allowance of about 5mm beyond the card insole on the bottom. On top, check that the two sides of the vamp meet each other neatly in line with your marker line, overlapping each other by 2-3mm. [15] [16] Trim if necessary.

16

17
If you are happy with how the vamps sit, proceed to sew a seam of about 5mm all around them, excluding the bottom as this will be glued to the underside of the card insole. [17]

18
On the paper template of the vamp piece mark out with a pencil the eyelet positions, ensuring they are evenly spaced and leave enough room between each other. If you are using 2.5mm eyelets, space them at least 8mm (from one centre point to the next). Use the punch pliers to make the holes into the paper and then mark them out on the leather with a pencil. [18]
Punch the holes into each side taking care that they are symmetrical. [19]

19

20

21
Sew a seam to the tongue, which will look a bit neater than leaving a cut edge. However if your boots are for a smaller doll, I would suggest to avoid this step as it may be too bulky. I have sewn a 5mm seam all around except at the base. [21]
The bottom of the tongue is to be glued to the underside of the toe box piece, centred on the straight edge.

22

23

24
Soles
25
Now you can get started on the other boot during the baking and cooling time!

26
Once cooled, you can glue the soles to the underside of each boot: First, carefully remove the doll foot from the shoe, leaving the card insole and toecap inside the boot. Then spread some glue onto the underside of the insole and then press it firmly against the sole, so that you get a nice neat join. Wait for the glue to set. [26]

Your dolly-girl or boy is now ready to show off their new style!
I hope you enjoyed this tutorial and found it useful! Feel free to leave any questions or comments, or to share links of your creations :)
Here's Evie showing off again ;)


Комментариев нет:
Отправить комментарий